Simple Static Site
This guide currently assumes you have a GitHub account, an Amazon S3 account and have installed a recent version of node.js.
Step 1: Choose a domain name
Start by choosing a domain name and registering it at somewhere like
123-reg. This guide assumes you have chosen example.com as your domain, so replace that with whatever domain you actually choose.
You should also decide whether you want visitors to go to www.example.com or just example.com. The rest of this
guide assumes you have chosen to direct visitors to example.com.
Create a cloudflare account and add your newly created domain.
Step 2: Create your website
Create a repository called example.com on
GitHub.
Add a .gitignore that has the following contents:
node_modules
out
Add a package.json that has the following contents:
{
  "name": "example.com",
  "private": true,
  "description": "A simple static website",
  "dependencies": {
    "express": "^4.13.3"
  },
  "devDependencies": {
    "rimraf": "^2.5.0",
    "s3": "^4.4.0",
    "stop": "^3.0.1"
  },
  "scripts": {
    "test": "echo No Tests",
    "deploy": "rimraf out && node deploy && rimraf out"
  },
  "repository": {
    "type": "git",
    "url": "https://github.com/my_github_username/example.com.git"
  }
}
Then run npm install to install dependencies.
Add a sever.js file containing:
'use strict';

var express = require('express');

var app = express();

app.get('/', function (req, res, next) {
  res.sendFile(__dirname + '/index.html');
});

module.exports = app.listen(3000);
Add an index.html file with whatever content you want in it, e.g.
<!DOCTYPE html>
<html>
  <head>
    <meta charset="utf-8">
    <title>ES Discuss</title>
    <meta name="viewport" content="width=device-width, initial-scale=1.0">
  </head>
  <body>
  </body>
</html>
Check that it works by running node server and navigating
to http://localhost:3000.
Now commit and push that code.
Step 3: Set up the bucket
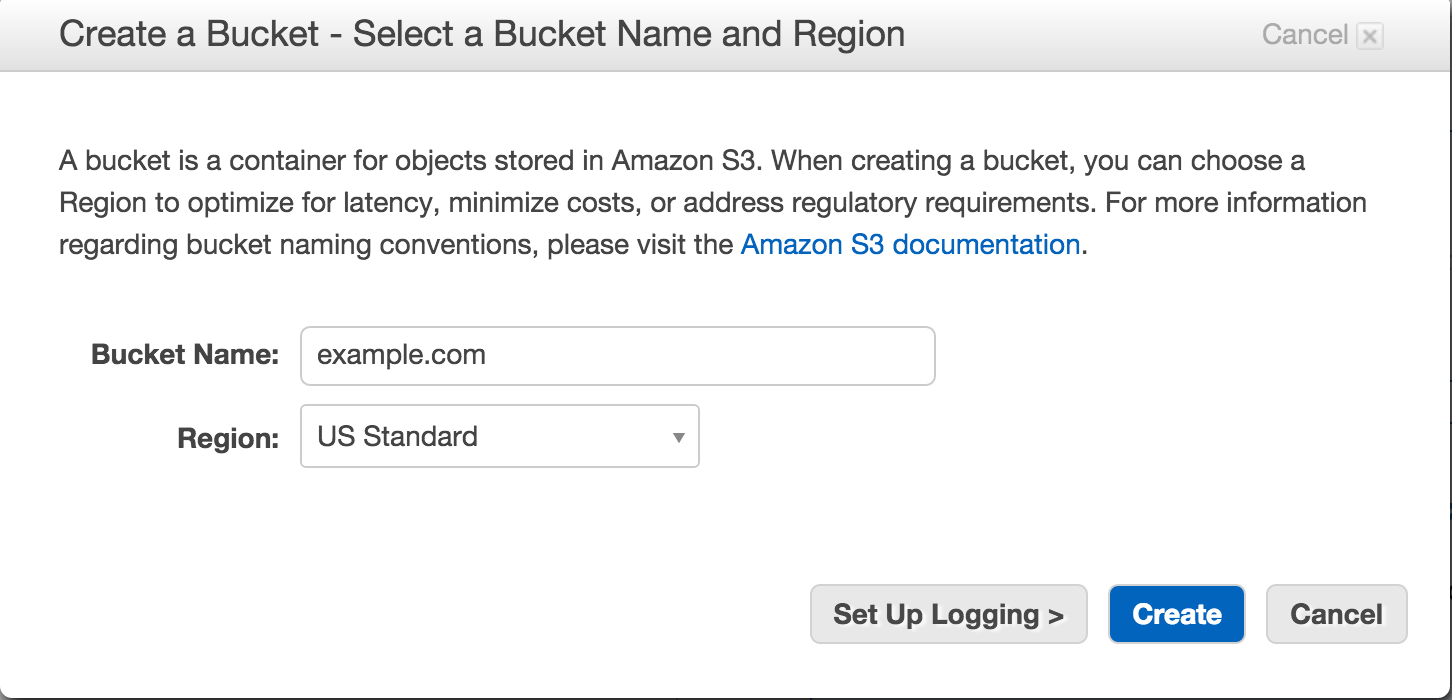
Log in to the AWS Console and select S3, then click the button to create a new bucket. Enter your domain name as the name of the bucket and select US Standard as the region.
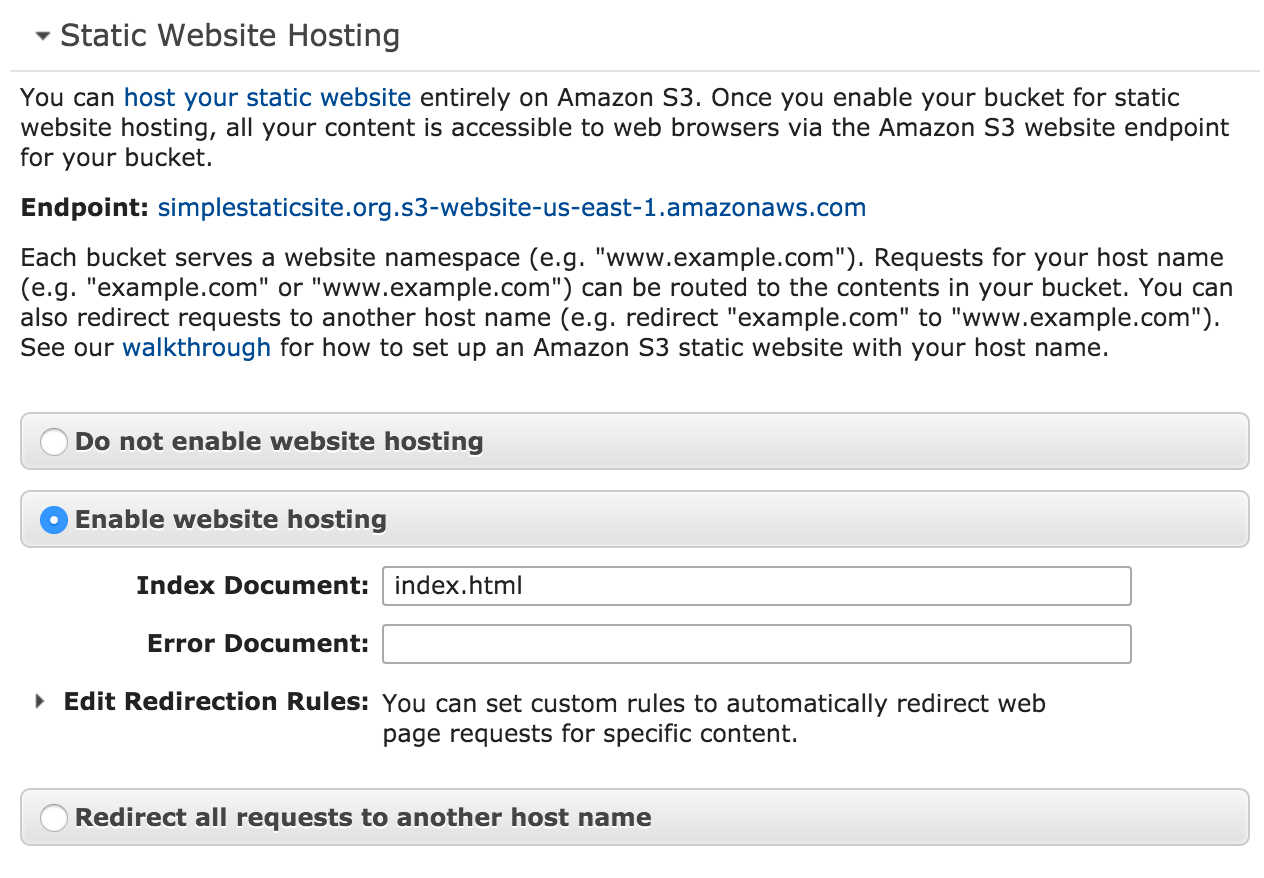
Select the newly created bucket and enable static website hosting.
Under the "Perissions" section, edit the bucket policy and set it to:
{
  "Version": "2008-10-17",
  "Statement": [
    {
      "Sid": "AddPerm",
      "Effect": "Allow",
      "Principal": {
        "AWS": "*"
      },
      "Action": "s3:GetObject",
      "Resource": "arn:aws:s3:::example.com/*"
    }
  ]
}
Step 4: Publishing to Amazon S3
Go to Travis CI and enable it for your repository. Then click settings.
Set the environment variables S3_BUCKET to example.com and S3_REGION to us-east-1. Be sure to enable "Display value in build log" for both of these as it will make debugging easier.
Go to the IAM tool in the AWS Console and create a new user called example.com. Set the newly created user's access key and secret as the values for S3_KEY and S3_SECRET respectively in the travis environment (be sure not to enable "Display value in build log" as you need to keep these values secret).
Attach a new Inline Policy to your user called example.com
with the following text:
{
  "Version": "2012-10-17",
  "Statement": [
    {
      "Effect": "Allow",
      "Action": "s3:*",
      "Resource": [
        "arn:aws:s3:::example.com",
        "arn:aws:s3:::example.com/*"
      ]
    }
  ]
}
Back in your repository, add a deploy.js file containing:
'use strict';

var url = require('url');
var fs = require('fs');
var stop = require('stop');
var s3 = require('s3');

var server = require('./server.js');


stop.getWebsiteStream('http://localhost:3000', {
  filter: function (currentURL) {
    return url.parse(currentURL).hostname === 'localhost';
  },
  parallel: 1
})
//.syphon(stop.addFavicon())
.syphon(stop.minifyJS())
.syphon(stop.minifyCSS({deadCode: true, silent: true}))
.syphon(stop.log())
.syphon(stop.checkStatusCodes([200]))
.syphon(stop.writeFileSystem(__dirname + '/out'))
.wait().done(function () {
  server.close();
  console.log('done building website');
  var client = s3.createClient({
    s3Options: {
      accessKeyId: process.env.S3_KEY,
      secretAccessKey: process.env.S3_SECRET,
      region: process.env.S3_REGION
    },
  });
  var uploader = client.uploadDir({
    localDir: __dirname + '/out',
    deleteRemoved: true,
    s3Params: {
      Bucket: process.env.S3_BUCKET,
      Prefix: ''
    }
  });
  uploader.on('error', function(err) {
    console.error('unable to sync:', err.stack);
  });
  uploader.on('end', function() {
    console.log("done uploading website");
  });
});
Add a .travis.yml file containing:
language: node_js
node_js:
  - "5"

# Use faster Docker architecture on Travis.
sudo: false

script:
  - npm test
  - test $TRAVIS_PULL_REQUEST == "false" && test $TRAVIS_BRANCH == "master" && npm run deploy
Commit and push these two new files and your site should get built and uploaded by travis. You should now be able to see your site at the static endpoint example.com.s3-website-us-east-1.amazonaws.com.
Step 5: Set up cloudflare
Now that you have the site hosted on S3, all that remains is to fix the URL so it is nice and memorable, and add support for https.
In cloudflare, edit the DNS records. First, remove any existing "A" or "CNAME" records, then add two new "CNAME" records:
@toexample.com.s3-website-us-east-1.amazonaws.comwwwtoexample.com.s3-website-us-east-1.amazonaws.com
Ensure cloudflare is enabled for both records
Go to "Page Rules" within cloudflare and add two new rules
- Pattern
http://*example.com/*, then enable "Always use https" - Pattern
www.example.com/*, then redirect tohttps://example.com/$1
Once those changes have propagated, you should be able to see your website by navigating to https://example.com/. It should also auto update every time you push new changes to GitHub.